How to Build a Barn Door….for Around 20 Bucks!
UPDATE: Since writing this post I have received so many questions regarding the hardware. I have searched and searched for another alternative and found an inexpensive option for barn door hardware on Amazon here. This is a great affordable option if you don’t want to build the entire thing yourself. However if you do please refer to the instructions below.
Living in a remodeled farmhouse we have lots of little nooks and crannies that I’m always trying to make function better. So building a sliding barn door was the perfect solution for a recent small space dilemma. Sliding barn doors are extremely popular in home design. They are great when traditional swinging doors are cumbersome. Unfortunately the tracks, doors and hardware can be super expensive. And I don’t know about you but my budget is always limiting my DIY material purchases.
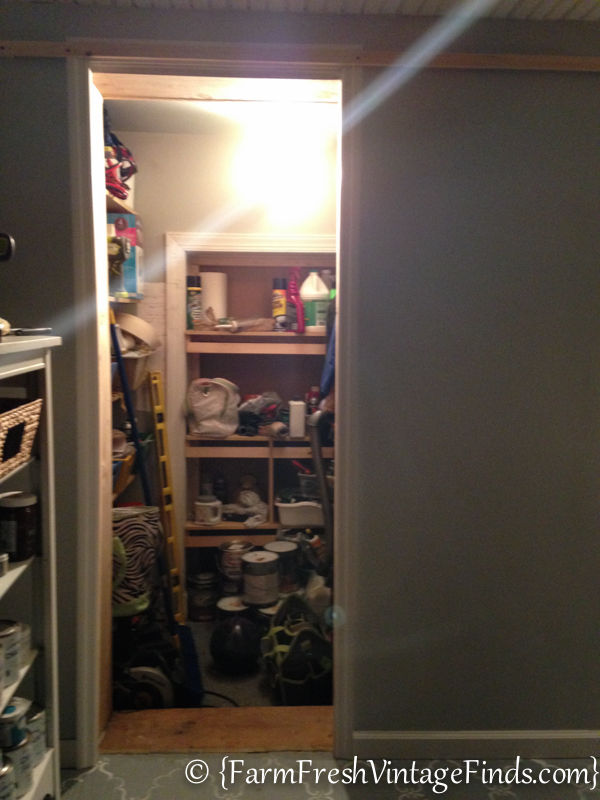
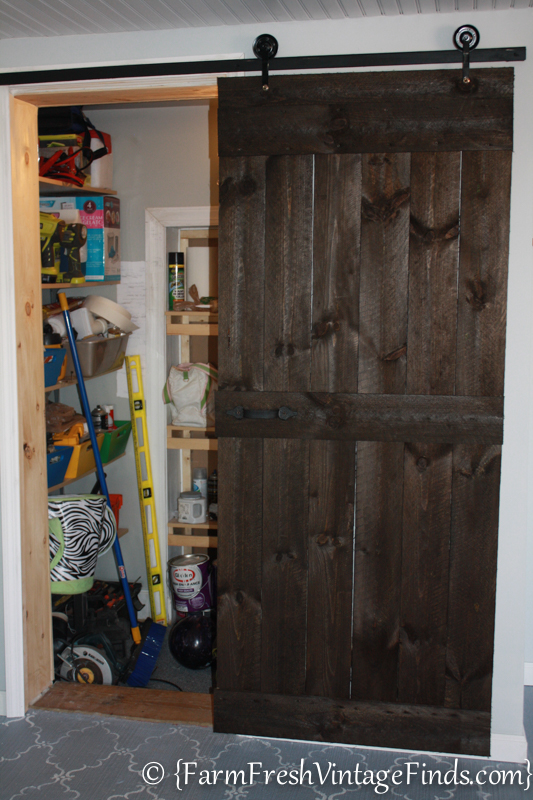
For instance in our garage we have this wonky little storage closet. It used to be a porch entrance before we built our garage. It holds things like car cleaning supplies, paper towels, brooms a few tools and other things that aren’t so pretty. We had originally planned to just leave the opening as a framed doorway but after looking at this mess for about 5 minutes I knew that wasn’t going to work.
Enter Prince Charming, who can always tell by the look on my face when things just aren’t going to work. Actually I know he was seceretly thinking the same thing cause after he looked at it for a few minutes he said “how about I build one of those barn doors you like and hang it up here”. BINGO! Now you’re talking!
Prince Charming has this amazing ability to engineer things in no time flat. It hasn’t always been this way but over the years, living on a tight budget, he learned how to do things for our family out of necessity and has discovered he has some mad skills and grown to enjoy the process. We’ve also acquired tools little by little over the years and that has helped out tremendously! Now I realize not every husband is handy with power tools and I’m grateful that mine is but I also want everyone to understand that Prince Charming didn’t just pick up a circular saw and go to town building things all over the house. Remember we’ve been working on this farmhouse since 2002! These things happen over time ladies. If you want to get things done around your house let your husband buy himself some power tools!!!! Or buy them for him! There’s something about power tools that make men happy. Get your man some power tools!
Ok back to business. For this project you will need:
10 Dog eared fence boards-$1.57 each
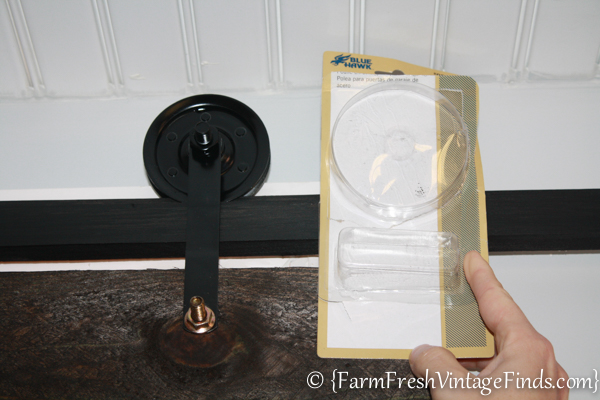
2 Clothes Line Pulleys-$5 each
(*****You can purchase the pulleys here *****)
1 Tongue and Groove Board-$1.49
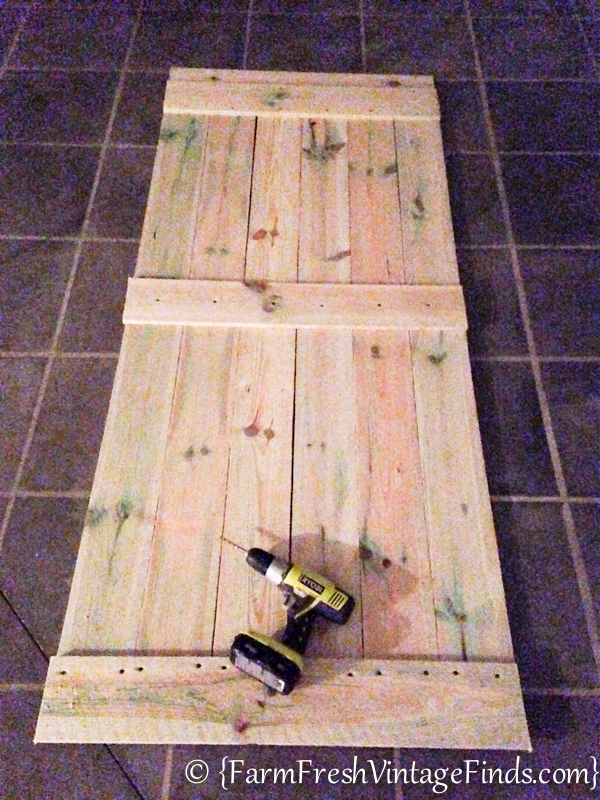
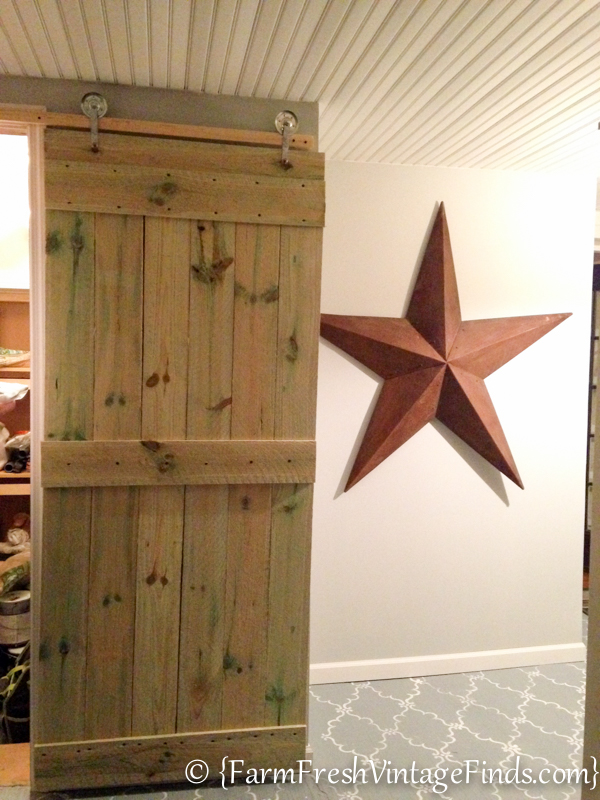
We chose dog-ear fence boards because they are lightweight and fairly inexpensive at less than $2 a board. Lightweight is important because of the wooden track we created. We measured our door opening and then cut the boards to fit with a few inch over hang on either side.
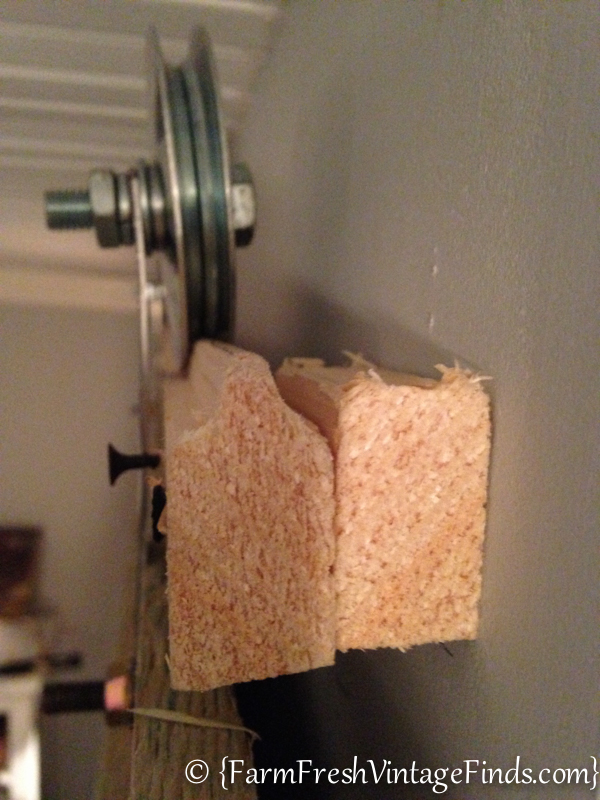
For the track we used a piece of tongue and groove lumber that we had left over from another project. The tongue was perfect for the….
sliding mechanism we purchased which consists of two clothesline pulleys.
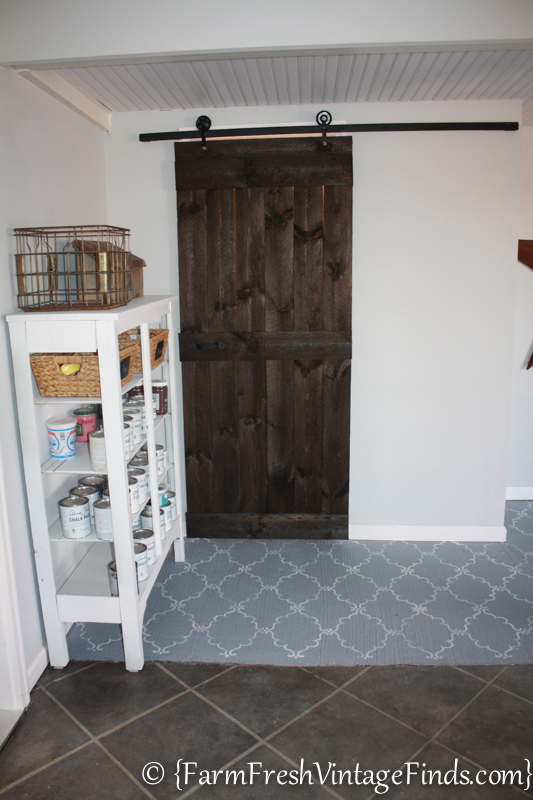
Once the door was installed we rolled it back and forth several times to make sure everything was going to work properly. Prince Charming did end up putting a screw at either end of the track so the door can’t accidentally be slid off.
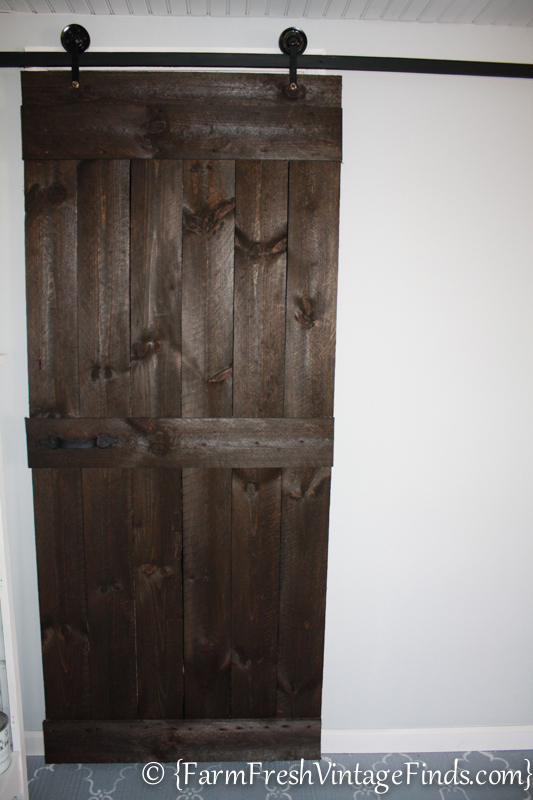
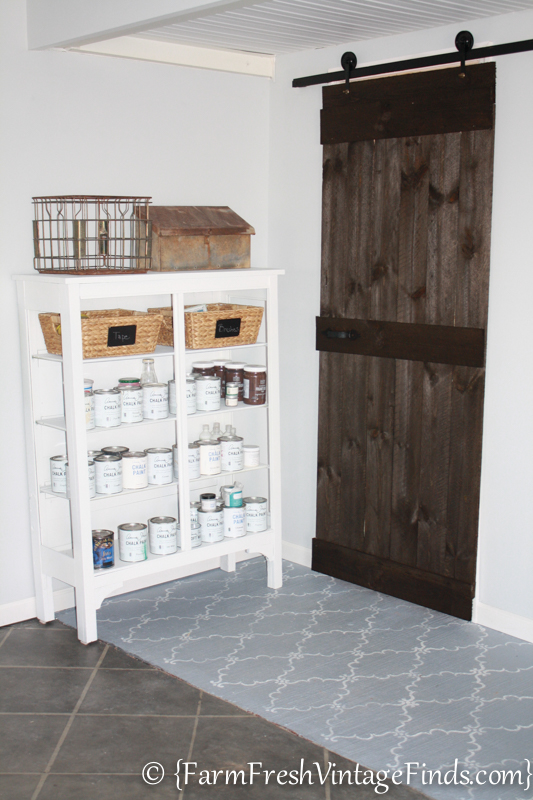
Lastly we painted the pulleys and the wooden track with gloss black spray paint and stained the door with General Finishes Java Gel stain (which by the way is my absolute favorite color!)
And there you have it! A sliding barn door for under $20! Now no one has to see our mess and all is right with my world once again!
Thanks for taking the time to join me today. I welcome your questions and comments. See you next time!
Affiliate links provided for your convenience.

can you please tell me where you got the pulleys? thanks love this project have the perfect place for it xx
Hey Cris-hubby got them at Lowe’s.
Beth can you tell me the size on the pulleys please. Thanks! Love it!
Deborah
lwefairfieldia@lisco.com
Deborah,
They’re roughly 4″. I’ve included a link to order from Amazon in the post.
Hope this helps,
Beth
Hi Beth,
I am THRILLED you shared your door since I need to make a couple of them, one for the pantry in our new manufactured home and one for the sliding door in the bedroom.
I followed the Amazon link and I tbink it is coming up to the wrong product. Could you check it out please? Thanks again for sharing (and for checking out the Amazon link 😉 )
Hi Debbie,
The link should be correct non, however the prices do fluctuate. I hope this helps and thanks for being here.
Blessings,
Beth
I’m not seeing the link posted here. Can you re post it? I’d like to make one of these myself.
Thanks,
B.Williams
Which link are you needing B. Williams?
Thanks,
Beth
What type of tongue and grove lumber did you use for the top of the door, for the pulley to glide on? In your photo, it looks like pressed board. I can’t imagine that pressed board would hold up to the constant friction of the door being opened and closed!
I really love your idea. I have been trying to figure out a door for a very awkward spot for five years now. The hanging barn door was always a possibility, but was too cost prohibitive for me. You and your knight solved this dilemma for me! Thank you so, so much!
Hi Valerie,
The top rail that the pulley slides on is a piece of trim. It’s pine I believe.
Thanks,
Beth
Hi Beth I know this probably a really old post but I was wondering where you hot the track that yhe pulleys slide on?
Thanks Scott
Scott,
The track is made of wooden trim. Please refer to the photo in the post to see it better.
Thank you,
Beth
Did u read the article? Its in the readings where she go them.
That is absolutely genius!!!! The hardware for most farm doors costs approximately $300.00. Your idea is very, very doable. Thank you for sharing!
Thanks Patty! Hubby has an engineering mind and is a problem solver. That’s for sure!
:0) Beth
What did you use to connect the pulleys to the wood?
Hi Cindy-we screwed them in using the little bar and blots that come with the pulleys. Refer to the photo so see what I mean. Thanks!!!!
Blessings,
Beth
I’m slightly confused because when I click the link the item that comes with the pulley is a U-shaped bracket not a flat?
Hi Lacey,
The link is correct. If you purchase the pulleys you will need to flatten them yourself.
Thank you for reading!
Beth
Needed … one door for my bathroom … fits the bill and goes along the line of the closet doors, at a price i can muster … thank you!
You’re welcome Laura!
hi Cindy, can you please give me more details about the pulley purchased at Lowes. We love you’re idea and want to do the same. TYIA
Hi Roxanne-Please refer to the photo to see the pulley package. This type is typically used for a clothesline.
Blessings,
Beth
Hi this is awesome! I’m wondering. Would the bottom of the door swing / push out? I’m thinking about doing a barn door like this to convert my living room into a study but I’m wondering how stable it is.
Hi Lisa! Thanks for you kind comments. This door certainly doesn’t need to be slid back and forth at high speeds but we open it several times a day and it works perfectly and doesn’t push out. Thanks for your question! Good luck building your own. 😉
Blessings,
Beth
Love your idea. I think it will fit in great with some distressing to fit our primitive era style. I did have a question about the upper and lower boards. What is the width and thickness of those boards. 1″x6″?
Thanks
Hi Travis-yes I believe they are 1×6’s
Thanks,
Beth
Love Love Love this. And at a price that is affordable. One question however, when looking at how the pulley is attached to the door, there is a vertical bar attaching the pulley wheel to the door. That didn’t come with the pulley did it? What did you use for the connecting bar piece.
Thanks for the info. Great post!
Kim
Hi Kim! It actually did come in the package with the pulley. Next time I’m at Lowe’s I’m going to find out exactly which section hubby was in when he bought it. 😉
Thanks for commenting!
Merry Christmas,
Beth
Would you please ask Prince Charming if those clothesline pulleys would work if used on a metal strip, the door I am considering would get a lot of use and I am wondering how the tongue and groove wood would hold up. Thanks, just started following you and love your ideas!
Cathy
Hi Cathy-I’d suggest getting the metal strip and seeing if it slides across freely…..as it’s really going to depend on the weight of the door and the groove in the metal. We open out door several times a day and so far it’s fine. 🙂 So glad to have you here!
Blessings,
Beth
You can always rub Gulf Wax on the Tongue and Groove trim; they sell it in all the Grocery stores and of course WalMart. Makes even wood to wood glide perfectly.
I was wondering about the bottom of the door, is it on a track? does the door tend to swing out when opening. I really like this idea but wondering about the bottom of the door. thanx
Hi Florence-The bottom of the door is not on a track. It would swing out if you pulled it out but we just use the handle to move it back and forth. The door is very lightweight so it moves easily. Thanks for you question!
Blessings,
Beth
Hi, we used an L- shaped bracket on the floor to hold our door. Works great. No problem
with the door wanting to swing out away from the doorway. Bonnie
That’s a good idea. We haven’t had a problem with it swinging out but if we do I’ll remember that. 🙂
Thanks,
Beth
I know this post is pretty old, but can you be more specific about where you put the L bracket?
Hi Leigh-I’m not sure what you mean about the L bracket?
Beth
Love Your idea of the sliding barn door I’ve always wanted one thank you for your info great site. 🙂
Thanks Sue!
Thank you!!! can’t wait to do this on my new pantry…what a $$$ saver!!!
You’re very welcome Joy! Send me a pic when you get it done. I’d love to see it!!!!
Blessings,
Beth
Beth on the pulley the strap or metal,piece did your husband bend it strait or did it come that length, the ones I looked up it shows a rounded piece of metal that wraps around the pulley. Thank you.
Ronda
Hi Ronda-The one that he found worked the way he bought it.
:0) Beth
Can you show us the part number. Red hawk does not have anything like what you are showing. And the long metal strap appears to be longer than the slot in the packaging. We’ve built the door and have a track ready, it is just that darn pulley that we can’t seem to find anywhere, not even online.
Hi Michael-I apologize for the confusion. Yes, hubby straightened it out. He did most of the hardware install so I didn’t realize it was straightened. Glad you were able to find it. I hope your project turns out fabulous!!!!!
Blessings,
Beth
I have been boggled by this for hours now. I’ve been looking online and went to several stores. YAY! Finally figured it out!!
Brilliant! And thanks for posting the pulley. We are going to try to do this for a closet hubby just built me in our entry way. My kitchen is what I consider “Campbell’s Tomato Soup Red”, very “country” 🙂 and I think this will look FAB! My husband was concerned that the fence pickets are only 6 ft. high and asked about the size of your door opening. He was also concerned about finding & being able to purchase just one board for the track. I am so excited about the prospect of this door, I can’t even tell you! Thank you so much for posting this and all the details you have shared! If you could please share the dimensions that would be awesome!
Hi Debbie-You’re very welcome! As far as dimensions as you might not be able to see in the photo we added a strip on the top and bottom that makes the door almost 7ft tall. between that and a little room at the top and bottom for hanging it fits like a glove! Good luck! I’m so glad you found me and were inspired to build your own door. 🙂
Blessings,
Beth
Hello! I love this idea and want to do this for my laundry room. I have two doors in the frame, do you have any suggestions on making this work for a two door frame?
Hi Taquita,
I would suggest having two tracks starting in the middle and go to the right and then one to the left. That way the weight would be more evenly distributed. Good luck with your project. Thanks for your kind words!
Blessings,
Beth
Hi, Beth!
I absolutely love this door!! I want to replace the boring aluminum closet door I currently have with something like this, but I keep stopping myself because of the price. But your way sounds pretty straight-forward, functional and affordable. Just one question: is the bottom part of the door fixed somehow? or it just ‘hangs’ a few milimeters above the floor?
Thanks!
Hi Marina,
The bottom of the door just hangs. You could always add a wheel or another rail across the bottom to hold it but it hasn’t been a problem for us. Thanks for your kind words!
Blessings,
Beth
Great timing. Not sure the date of this DIY, but you saved me for finding doors to fit a closet in my art/office room. Plus the bathroom. I need to put a lock on the inside, but having the door just over the opening for this will work. And the bath has added room with a barn door. The pullies look like they could be used for a myriad of projects. Thanks to your hubby for finding them.
Hi! I was just wondering what made you go with the Dog Eared Fence board as opposed to straight cut 1″x6″ boards? I am seeing dog eared fence board at a higher price than the price of 1″x6″x8′ boards.
Great post! Looking to add this to kind of block off one of the two doors to my kitchen!
I apologize! I was looking at premium wood fence boards! I can’t wait to try this!
No worries Gregory. Good luck with your project!!!!
Blessings,
Beth
The pulley you linked in on your website goes to a garage door pulley and the metal bar that comes with it doesn’t look like the one you have in your pictures. Also, how is the door holding up? Have you had issues with the pulley’s coming off the track? BTW, love this idea!
Thanks!
The metal bar on the pulley in the link needs to be straightened and then it works great. As far as holding up the door has now been hanging for a year and it still works great!
Thanks for your comments 🙂 Beth
Do you have a tutorial for just putting together the door?
Hi Mindy-I’m sorry I don’t have a tutorial for that. I’ll try to write one together soon.
Thanks,
Beth
Just wondering if you glued the boards together with wood glue and clamps? Or if that’s not necessary?
Thanks!
Hi Calista,
No we didn’t. You certainly could but I wanted there to be a slight bit of separation in the boards.
Thanks,
Beth
Did you remove the trim from the doorway?
No we left the trim on and just built out the track that the door runs on so that it would hang in front of the trim.
Thanks,
Beth
Thank you for your GREAT idea. I have thee 8 ft closets with double doors and this will really help me out. I will be waiting for your ideas on staining concrete :). If you can email me once you have posted that info I will greatly appreciate it.
Thanks, Anna
Great job and getting ready to do one for my sons closet. How did your husband straighten the metal u-hooks from the pulley
Where did you get the tongue and groove board and what type of hardwood is it?
Hi Monique,
The wood is from Lowes. They are called dog eared fence boards. Hope this helps!
Thanks,
Beth
Hey Beth,
I’m looking to build this but am having trouble finding “tongue and groove board”. Do you remember exactly what kind of board that was?
Thank you!
Hey Jess,
The boards we used are called dog eared fence boards. Hope this helps!
Beth
Hi there. I am wondering the same thing and am not getting the answer I think either of us are looking for. The “tongue and groove” board that you had left over from a previous project. Where did you get that? Because all I’m finding are flooring options that are a lot thicker than the one that you have. Not the “dog eared fence boards.” Please and thank you!!! Am looking to make this for a door in our office!
Hi Caitlyn,
I get tongue and groove boards from my local home center and from a local sawmill.
Thanks,
Beth
No questions, I just wan to say how much I enjoyed reading your article . I love your door but mostly I love the way you wrote it! Thanks for posting!
LaVonne,
Thank you! So glad to have you here.
Blessings,
Beth
Thanks for the great DIY! I did this on Saturday and it turned out great!
Yay!!!!! That’s great Justin. Please email me some photos! farmfreshvintagefinds@gmail.com
So glad you were able to use the tutorial.
🙂 Beth
Do you have any trouble with the door rubbing along the wall?
Hi Cathy,
Nope we don’t. It’s far enough away from it that it doesn’t rub.
Thanks for your question,
🙂 Beth
Just what I needed for a 1/2 bath off back door by kitchen no door just got shower curtain up now. Some one was to put up pocket door & they never finished it. I don’t know how to finish it cheap . So I’m trying your door. Thanks for the idea.
You’re very welcome Virginia! Good luck with your project and thanks for reading!
🙂 Beth
I just spent two days doing this project. First of all, it is most definitely an amazing idea! Second, it’s not THAT simple. Building the door is simple, yes. However, I used 6 ft fence boards, added a 1×6 to the bottom and my door is still WAY too short. It worked when I had a 1×6 at the top also, but if you look at the photo, you’ll see that the pulleys (3″ garage door pulleys from Lowe’s) are bolted to the fence boards, not to a 1×6 that is needed at the top to make the door long enough. I tried leaving the extended board at the top and it wouldn’t slide because of the overlap on the back catching on the door frame. Also, the nuts need to be towards the outside so the bolts don’t also hang up on the frame. Hanging this baby alone is no picnic either, an extra set of hands is VERY helpful!! So now my door is finally hung & it’s 5 inches too short. And it’s hitting the plug for the TV and DVD player. Lol Lol Lol Any suggestions to make this door longer would be ever so helpful!
Hi Kallie,
Sorry you had so much trouble. This is just a guide to get you started. Not sure how your measurements were off but each door opening is different and will therefore need adjusting. I’m glad you were inspired to try this project and I’m sure it’s fabulous. Thanks for reading and have a fabulous day!
Beth
Can you utilize a door like a 6 panel instead of what you used?
Hi Janie,
It would depend on the weight of the door. This works because the door is very lightweight.
🙂 Beth
I only just found you today. I love this idea. My son and daughter-in-law just bought one. Very expensive and I love theirs. My husband is very creative handy but could not figure out how to do this. Your post is perfect. I have saved it to show him. Thank you so much. I am positive he can do this.
Hi Kathy,
Thank your for your kind words! Good luck with your project.
🙂 Beth
My prince charming is handy also. I think I will put him to work on a door for our bedroom closet. We have also been working on an old house since 1991. lol Takes a long time when raising kids because of lack of money. Empty nest now so we can get more done.
These look great. Are there two horizontal pieces on the top of door?
Thank you Becky! I’m not sure I understand your question though???
Hey there,sweet idea! I noticed what looks to be annie sloan paint on your shelves – I’m a designer and painter of 35+ years and have a recipe that’s less than a third of the price should you want it. rockrockcastle@gmail.com
Rock
Hi,
I actually have several recipes myself but now use DIY Chalk and Clay Paint. It’s the best I’ve ever used!!!!
Thanks,
Beth
Hi Beth,
Did your husband use screws or nails when forming the door?
Liza
Hi Lisa,
He used screws. Thanks for reading!
Beth
Loved this post. I have been needing to build a barn door for several months in a newly remodeled space in our home but the hardware was too costly. Thank you for your clear directions. I can easily adapt your door to our space. Thanks again. Forever grateful.
Hi Judy,
You are very welcome! Good luck with your project!!!!
Blessings,
Beth
Hi! Just ordered the sliding kit from eBay. However, I am going to do 2 doors at 2 ish feet across. Would love your opinion, do you think only having one bracket on each (placed in the middle) is sufficient?
Hi Shannon,
Without knowing the weight of your doors I can’t say for sure but I would recommend two brackets for each door for sure. I don’t think the door will hang well on just one bracket and you want it to be sturdy.
Thanks for reading!
Beth
This is so helpful! I found you through the magic of Pinterest and now I have subscribed to your newsletter. I love it!
Thank you Beth! So glad I could help.
🙂 Beth
Hi Beth,
Just wondering if you have had any problems with the boards warping? Love your post!!
Thanks Judy
Hi Judy,
No we haven’t had any problems with the boards warping. The door still works and looks as good as the day we installed it. 🙂
Thanks for reading,
Beth
Hi Beth,
Love this idea. Do you have to put anything on the bottom of the floor for sliding purposes. I was thinking about a barn door but my husband said he wasn’t going to drill a hole in a ceramic tile.
Thanks, Lisa
Hi Lisa,
We did not put anything on the floor. The door has been up now for two years and still works and looks great!
Thanks,
Beth
Thanks so much for the idea. Did you send the dog eared planks? If so, were they smooth when you finished?
Thanks!
Hi Lisa,
So I didn’t sand them. I wanted the door to have a rough look and we don’t run our hands over it so it isn’t a problem. You absolutely could sand them smooth though.
Thanks!
Beth
I’m SO excited to try this but have a few questions (and I’m hoping you will be able to answer since this is such an old post).
1. At the top of the door, it looks like there is a board that is horizontal where the pulley is attached. Is that the case, and if so, how did you attach that to the boards going vertical?
2. How thick is the tongue and groove board you used as the track?
3. It looks like you attached the tongue and groove board to another board that is attached to the wall. Can you explain why and if it’s just a small block of wood?
Hi Ashley,
You will need to attach the boards together with a board running horizontally. The t and g board for the track is a 1/2″. And yes we attached the t and g board to another board. You will need to do this to keep the door off the wall enough so it doesn’t scratch the wall and slides easily.
Thanks,
Beth
Hi,
Im sorry but I just cant tell what the metal pieces are that hang from the pulley to the door. Thanks
Hi,
They come with the pulleys. You will need to flatten them out to attache them.
Thanks!
Beth
Thank you thank you thank you! I (with the help of my Prince Charming hehehe) just did this for our pantry! I wish I could post a picture! It turned out so perfect! Thank you so much for the great tutorial! The pulley are actually garage doors pulleys at Lowes and they worked wonder! We ended up buying a premade door slab at Lowe’s for $30 and it worked just as well (I was too lazy to build a door)! Thanks again for the great idea, I’m THRILLED!!! 😀 😀 😀 😀
Yay!!!! I’m so glad to hear this. You can email me farmfreshvintagefinds@gmail.com if you want. I’d love to share them on my Facebook page.
🙂 Beth